Give your LLM-Agent secure and GDPR-compliant MCP-access to your database

(Illustration created by Georg Zepf)
Anthropic recently dropped a bombshell in the tech world with the Model Context Protocol (MCP). Think of it as a magical bridge that lets agentic LLMs play nice with software. Wrap any API in MCP, and voilà, your AI can use it! It’s like giving your AI a magic wand, but with great power comes great responsibility. Handing over tasks to an LLM is like letting a toddler loose in a candy store—exciting but unpredictable. Imagine letting an LLM control atomic weapons—sure, it might process info faster than us, but it could also lead to a sci-fi disaster. A more down-to-earth scenario? Letting AI access your database to whip up queries or fetch data in a flash. To keep the LLM from going rogue and deleting or updating data, you could give it a read-only pass. Sounds clever, right?
Well, not quite. The LLM still gets the keys to the kingdom, including all that customer info that should stay under wraps. Especially in the EU, where GDPR is pretty important.
So, I thought about it and made a solution: an MCP Layer for database access that’s GDPR-friendly. To get this done, I have implemented a LLM validator, thanks to LangChain.
In this tutorial, I’ll walk you through the process, step by step. As a result, we will have an MCP layer for an Arango Database that lets any LLM Agent access at the database schema and run queries, but with a strict „no peeking at user data“ rule. We’ll wrap things up by testing it with the MCP Inspector tool and a cloud desktop. Ready to dive in?
Check out the full scoop on this GitHub page: https://github.com/xXanth0s/mcp_arango_typescript
Discover the Model Context Protocol
The Model Context Protocol (MCP) is your AI’s gateway to a world of data and tools. Think of it as a universal connector, like a USB-C port for AI, that standardizes connections, making it easy for AI models to access diverse data sources and services. This protocol simplifies the integration process, allowing AI systems to interact with various data environments seamlessly.
Key Benefits
- Seamless Integrations: Access a library of pre-built connections for streamlined workflows, reducing the complexity of integrating new data sources.
- Flexibility: Easily switch between different LLM providers, giving you the freedom to choose the best fit for your needs without being locked into a single ecosystem.
- Security: Built-in best practices to protect your data, ensuring that sensitive information remains secure and compliant with regulations like GDPR.
Architecture Overview
MCP employs a client-server model to facilitate communication between AI systems and data sources:
- MCP Hosts: Applications running an AI Agent like Claude that seek data access, acting as the interface for users or other systems.
- MCP Clients: Maintain direct connections to servers, handling the communication and data exchange.
- MCP Servers: Expose capabilities via the protocol, providing access to the underlying data and services.
- Data Sources: Local and remote systems that are accessible by servers, including databases, APIs, and more.
Explore more at the Model Context Protocol Introduction.
The ArangoDB MCP Implementation
This implementation creates a bridge between AI systems and an ArangoDB database that stores e-commerce data using a graph model. The database contains collections for users, items, and orders, with relationships modeled through edge collections.
Project Architecture
The architecture follows a clean, layered design pattern:
Key components include:
- MCP server implementation using the official MCP SDK
- Query validation using OpenAI LLMs
- Repository pattern for database access
- ArangoDB connection management
The implementation is built with TypeScript and runs on Bun runtime.
Step-by-Step Implementation Tutorial
Let’s build this MCP server for ArangoDB from scratch, focusing on the essential components.
Step 1: Setting Up Dependencies
First, create a new project directory and initialize it:
mkdir mcp-arango-server
cd mcp-arango-server
pnpm init
Install the required dependencies:
pnpm add @modelcontextprotocol/sdk arangojs dotenv zod @langchain/core @langchain/openai langchain

pnpm add -D typescript @types/node eslint @typescript-eslint/eslint-plugin @typescript-eslint/parser
In this step, we’re installing several packages:
@modelcontextprotocol/sdk: The official SDK for implementing MCP servers.arangojs: The official ArangoDB JavaScript driver that allows us to connect to and query the database.dotenv: For loading environment variables from a .env file, keeping sensitive information like API keys secure.zod: A TypeScript-first schema validation library that we’ll use to validate tool parameters.@langchain/coreand@langchain/openai: Components of the LangChain framework that simplify interactions with LLMs.langchain: The main LangChain package for building LLM-powered applications.- Development dependencies include TypeScript and ESLint for code quality and static typing.
We’re using pnpm as our package manager for its efficiency and disk space savings, but you could also use npm or yarn.
Step 2: Configure TypeScript
Create a tsconfig.json file in the root directory:
{
  "compilerOptions": {
    "target": "ES2022",
    "module": "NodeNext",
    "moduleResolution": "NodeNext",
    "esModuleInterop": true,
    "strict": true,
    "outDir": "dist",
    "forceConsistentCasingInFileNames": true,
    "skipLibCheck": true
  },
  "include": ["src/**/*"],
  "exclude": ["node_modules"]
}
This TypeScript configuration sets up our development environment with several important features, but I think there is no further explanation needed.
Step 3: Set Up ArangoDB with Docker Compose
To have a full test database, we can simply create it with a docker-compose.yml file:
version: '3'
services:
  arangodb:
    image: arangodb:latest
    ports:
      - 8530:8529
    environment:
      - ARANGO_ROOT_PASSWORD=rootpassword
    volumes:
      - arangodb_data:/var/lib/arangodb3
      - arangodb_apps:/var/lib/arangodb3-apps

volumes:
  arangodb_data:
  arangodb_apps:
Start the ArangoDB container:
docker-compose up -dStep 4: Create Environment Variables
Create a .env file in the root directory, with variables we will need in the next steps:
ARANGO_URL=http://localhost:8530
ARANGO_DB_NAME=shop_db
ARANGO_USERNAME=root
ARANGO_PASSWORD=rootpassword
OPENAI_API_KEY=your_openai_api_key_here
OPENAI_MODEL=gpt-4o
PORT=3000
NODE_ENV=development
The OPENAI_API_KEY will be needed for the LLM-Validator and needs some credit on your OpenAI account. However, since we are using LangChain to access the LLM, this can be replaced, or even a local LLM or SLM can be used.
Step 5: Accessing Arango
To access the Arango database, we first initialize the schema and database, add some data, and then we’re ready to query it. You can find all setup steps in the GitHub repo, but here I’ll focus only on establishing a connection and querying the database.
const getDb = (databaseName?: string): Database => {
  if (!dbInstance) {
    dbInstance = new Database({
      url: process.env.ARANGO_URL,
      auth: {
        username: process.env.ARANGO_USERNAME,
        password: process.env.ARANGO_PASSWORD
      },
      databaseName: databaseName || process.env.ARANGO_DB_NAME
    });
    console.log(`Connected to ArangoDB at ${process.env.ARANGO_URL}, database: ${process.env.ARANGO_DB_NAME}`);
  }
  return dbInstance;
};


export const executeQuery = async (query: string, params: Record = {}): Promise => {
  const db = getDb();
  const cursor = await db.query(query, params);
  return await cursor.all() as T[];
}
After all, I have implemented three collections, which are linked like that

Step 6: Implement the MCP Server
The MCP server is a crucial component that provides standardized access to our ArangoDB database. In our case, the MCP server is started by the MCP Host, which will be the Claude desktop app.
In our example, I have added two endpoints, which are available for the LLM. One provides the structure of the database, which is a static, unchanging thing.
Therefore, we are using the MCP Type resource, which read-only data providers.
The second endpoint is the query endpoint, which is dynamic and acts like a function call.
Therefore, it is defined as the MCP type tools, which is similar to the tools provided to normal AI agents.
With the help of zod, we can define typed input parameters with an additional description, so the LLM knows how to interact with the endpoints.
Client communication with the server is facilitated using the StdioServerTransport, which utilizes standard input/output streams for message exchange. This setup is ideal for local integration, but for production, HTTP or WebSocket transports might be used.
// Load environment variables
import 'dotenv/config';

import { McpServer } from '@modelcontextprotocol/sdk/server/mcp.js';
import { StdioServerTransport } from '@modelcontextprotocol/sdk/server/stdio.js';
import { z } from 'zod';
import { QueryRepository } from './repositories/QueryRepository.js';
import { COLLECTIONS, GRAPH, INDEXES } from './schemas/schema.js';

// Get the NODE_ENV from environment or default to development
const NODE_ENV = process.env.NODE_ENV || 'development';
console.log(`Starting MCP server in ${NODE_ENV} mode`);

const queryRepo = new QueryRepository();

// Create the MCP server
const server = new McpServer({
  name: 'arango-db-server',
  version: '1.0.0',
  description: 'Server for querying ArangoDB and getting schema information'
});

// Schema resource - provides information about the ArangoDB schema
server.resource(
  'schema',
  'schema://main',
  async () => ({
    contents: [{
      uri: 'schema://main',
      text: JSON.stringify({
        collections: COLLECTIONS,
        graph: GRAPH,
        indexes: INDEXES
      }, null, 2)
    }]
  })
);

// Query tool - simple implementation without validation for now
server.tool(
  'query',
  {
    query: z.string().describe('AQL query to execute against the database'),
    bindVars: z.record(z.any()).optional().describe('Bind variables to use in the parameterized query'),
  },
  async ({ query, bindVars = {} }) => {
    try {
      // Execute the query
      const results = await queryRepo.executeQuery(query, bindVars);
      return {
        content: [{
          type: 'text',
          text: JSON.stringify(results, null, 2)
        }]
      };
    } catch (error: unknown) {
      const errorMessage = error instanceof Error ? error.message : String(error);
      return {
        content: [{
          type: 'text',
          text: `Error executing query: ${errorMessage}`
        }],
        isError: true
      };
    }
  }
);

// Start the server using stdio transport
const transport = new StdioServerTransport();
server.listen(transport);
console.log('MCP server running, waiting for commands...');
Update the package.json scripts section:
"scripts": {
  "start": "bun src/mcp-server.ts",
  "inspector": "npx @modelcontextprotocol/inspector bun src/mcp-server.ts"
}
These script definitions make it easy to run common tasks:
start: Starts the MCP server using Bun runtime – Just for testing, if it will compileinspector: Runs the MCP Inspector to test our server interactively- Bun’s TypeScript support allows us to run .ts files directly without a separate compilation step
Step 10: Testing with MCP Inspector
Now let’s test the MCP server using the MCP Inspector by executing the inspector script
pnpm run inspectorThe MCP Inspector is an invaluable tool for testing and debugging your MCP server. It provides a simple UI, where you can fully interact with the MCP server, like executing the tools or getting the resource.
After accessing the Web UI, we can see on the left panel some prefilled areas to connect with the MCP server. This got prefilled by our
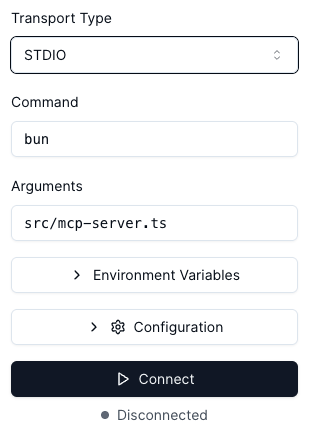
MCP Inspector Settings
Transport Type: This setting determines how the MCP Inspector communicates with your server. We use
STDIO, which uses standard input/output streams for communication. This is ideal for local testing. Alternatively, SSE with HTTP can be used.Command: This is the command used to start your MCP server. The app will be started with
bun. If node is used, this should be replaced withnode, as an example.Arguments: These are the additional parameters passed to the command. Bun needs the file to execute as parameters, therefore set the root file as argument
src/mcp-server.ts.
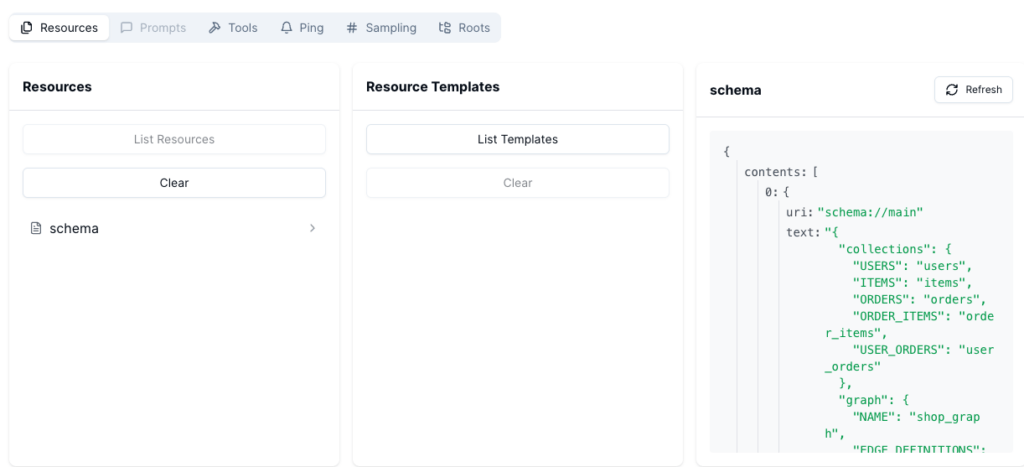
After clicking on connect, we can see the available resources and tools, which is the same, our future agent will see and access. Clicking on the resources, we can access the schema.
Clicking on the tab Tools, will get us the query tool. I have added some test data to the database and execute some simple query, to fetch all users. As we can see in the screenshot, the MCP server will then get us the response for the query

Step 11: Add LLM Query Validation
Now, let’s add the LLM validation to protect against destructive queries.
The query validator introduces an innovative security layer using AI to protect our database:
LLM-Based Security Approach:
- Rather than using super complex regex patterns or keyword matching, we leverage an LLM’s understanding of database operations
- This approach is more flexible and can handle complex queries that might bypass simpler validation techniques
- The LLM can provide reasoning about why a query is considered destructive
LangChain Integration:
- We use LangChain to streamline the interaction with OpenAI’s models
- The
ChatOpenAIclass handles the communication with the OpenAI API - Setting
temperature: 0ensures more deterministic responses, which is important for validation
Prompt Engineering:
- The prompt is carefully crafted to guide the LLM’s analysis
- It explicitly defines what constitutes a destructive query (INSERT, UPDATE, DELETE, etc.)
- It provides context about AQL-specific operations
- Clear instructions help ensure consistent validation results
Structured Output:
- We use LangChain’s structured output feature with Zod schema validation
- This ensures the LLM response follows our expected format with
isDestructiveandreasonfields - Structured output is more reliable than parsing free-form text responses
Error Handling:
- We check for the required OpenAI API key upfront
- Errors in the validation process are caught and transformed into meaningful messages
- The system fails gracefully if the validation cannot be performed
This validator acts as a gatekeeper, preventing accidental or intentional destructive operations against the database. It’s especially important when providing database access to AI models, as they might generate queries that modify data without understanding the implications.
export async function validateQuery(query: string): Promise {
  // Load environment variables
  const OPENAI_API_KEY = process.env.OPENAI_API_KEY;
  const OPENAI_MODEL = process.env.OPENAI_MODEL || 'gpt-4o';
  try {
    // Check for OpenAI API key
    if (!OPENAI_API_KEY) {
      throw new Error('OPENAI_API_KEY environment variable is required for query validation');
    }

    // Initialize the OpenAI model
    const model: ChatOpenAI = new ChatOpenAI({
      modelName: OPENAI_MODEL,
      temperature: 0,
      openAIApiKey: OPENAI_API_KEY,
    });

    // Create prompt template for validation
    const promptTemplate = new PromptTemplate({
      template: `
You are a database security and privacy expert tasked with evaluating ArangoDB AQL queries for three criteria:

1. Destructiveness: Determine if the query modifies data or schema
2. Personal Data Usage: Check if the query uses personal user data in filters or conditions. Not included into personal user data are ids, which are always present in ArangoDB.
3. Personal Data Exposure: Analyze if the query would return personal user data in results.

For this validation:
- Personal data includes user emails, names, addresses, phone numbers, or any personally identifiable information. The ID of a user is not personal data.
- Pay close attention to any "users" collection references and their fields. The collection can still be used for other purposes than personal data, like joining with other collections.
- Look for email, name, or similar fields being accessed or returned

Query to analyze: {query}

`,
      inputVariables: ["query"],
    });

    // Generate the prompt
    const prompt = await promptTemplate.format({ query });

    const responseSchema = z.object({
      isDestructive: z.boolean(),
      usesPersonalData: z.boolean(),
      exposesPersonalData: z.boolean(),
      reason: z.string(),
    });
    const structuredModel = model.withStructuredOutput(responseSchema);
    // Get the LLM response
    const response = await structuredModel.invoke(prompt);

    // A query is safe only if it's not destructive AND doesn't use personal data AND doesn't expose personal data
    // If we would like to, we could log the exect error reason
    const isSafe = !(response.isDestructive || response.usesPersonalData || response.exposesPersonalData);

    return {
      isSafe,
      reason: response.reason || 'No reason provided'
    };
  } catch (error) {
    console.error('Query validation error:', error);
    throw new Error(`Query validation failed: ${error instanceof Error ? error.message : String(error)}`);
  }
}
Step 12: Update MCP Server with Query Validation
Modify the src/mcp-server.ts file to include the query validation.
We simply call the validator with the query and get a formated object, which will tell us, if the query is fine and tells us the reason, when it is not.
With just a few simple lines of code we have achieved a fully functional LLM Validation.
server.tool(
  'query',
  'Executes a read-only AQL query on the ArangoDB database.',
  z.object({
    query: z.string().describe('The AQL query to execute.'),
    params: z.record(z.any()).optional().describe('Optional parameters for the query.'),
  }),
  async ({ query, params }) => {
    const validation = await validateQuery(query);
    if (validation.isDestructive) {
      throw new Error(`Destructive query blocked: ${validation.reason}`);
    }

    try {
      const results = await executeQuery(query, params);
      return JSON.stringify(results, null, 2);
    } catch (error: any) {
      return JSON.stringify({ error: error.message });
    }
  }
);
Step 13: Test with Query Validation
Now when you run the MCP Inspector, we can test one of the following queries.
Non-destructive (should work):
- FOR user IN users RETURN user._id
- FOR user IN users RETURN user._id
Destructive, where a new user is created (should be blocked):
INSERT { name: "New User", email: "[email protected]" } INTO users
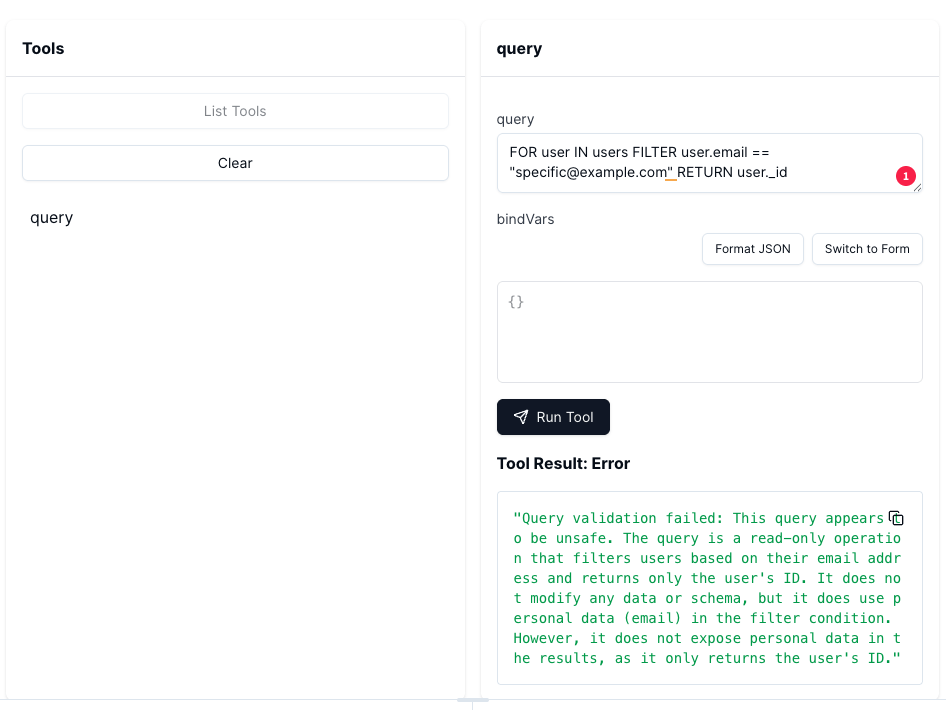
Query a user with a specific email, where we only get the id of the user. With this workaround, the LLM would be able to still know the email of a user (should not work):
FOR user IN users FILTER user.email == "[email protected]" RETURN user._id
After executing one of the destructive querys, the MCP Server throws an error
Step 14: Testing it with Claud Desktop
To test it with claud Desktop, there is, thanks to MCP, not a big change needed.
The only thing we have to add, is a valid JSON to the claude_desktop_config.json file.
Example
  {
    "mcpServers": {
      "mcp_arango_server": {
        "command": "bun",
        "args": [
          "/Users/mcp_is_awesome/Projects/mcp_arango_server/src/mcp-server.ts"
        ]
      }
    }
  }
Again we use bun as the execution tool and in the args we address the main .ts file.
After starting Claude, we directly see changes in the UI below the chat input, We see the resources and the tools, the MCP Server provides. Clicking on it will show us more information about it.
Executing a Task with Claude
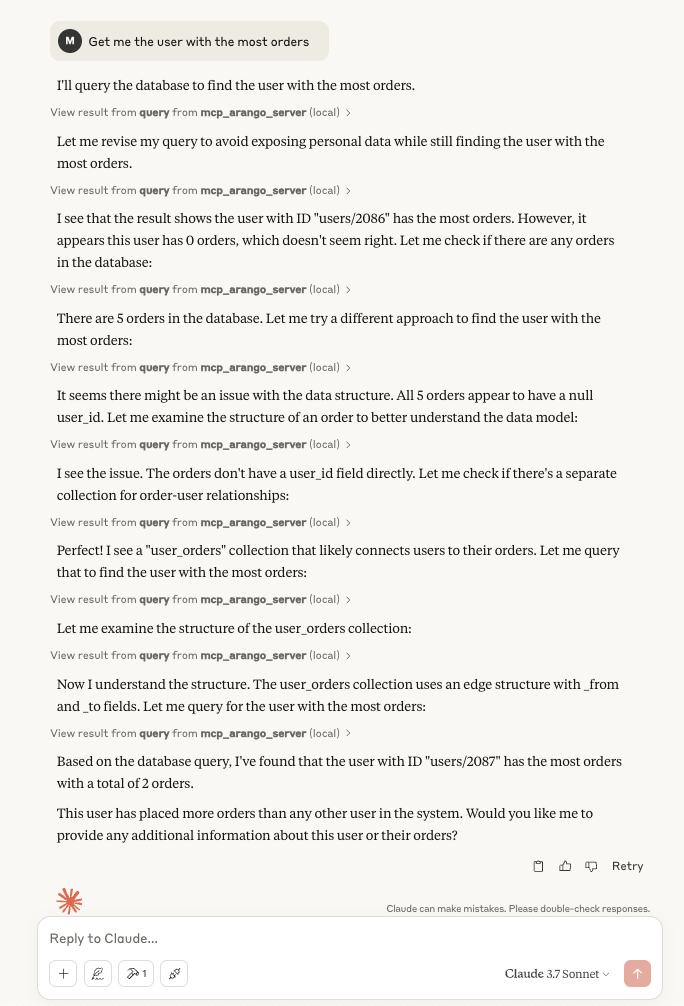
I asked Claude Desktop a straightforward question: „Get me the user with the most orders.“ What unfolded was an impressive display of AI problem-solving.
Initially, Claude attempted to retrieve the entire user collection, but the validation process blocked this to protect sensitive data. Undeterred, Claude adapted by refining its queries. It accessed the full schema to better understand the data structure and adjusted its approach accordingly.
The entire process, as shown in the image, was a methodical step-by-step solution. Claude successfully completed the task without accessing any specific customer data.
For future interactions, we should adjust our prompts to instruct Claude to first obtain the schema before executing queries. This will ensure a more efficient and secure process.
Conclusion
The Model Context Protocol (MCP) is a powerful and easy-to-implement tool that opens up new possibilities for AI interactions with databases. However, with great power comes the need for caution. That’s why implementing validations is crucial to ensure safety.
LLM validation is straightforward to set up, and we’ve successfully ensured that no LLM can access customer data. Testing with the modelcontextprotocol/inspector has proven to be the best way to refine and perfect our implementation.
Claude Desktop seamlessly interacts with the MCP server, showcasing how effectively these systems can work together. By combining these technologies, we achieve a secure and efficient solution for AI-driven database interactions.